Health Blog

Wednesday, April 15, 2020

How To Do Body Massage at Home? (Naturopathy Massage Techniques and Benefits)

April 15, 2020
How To Do Body Massage at Home? (Naturopathy Massage Techniques and Benefits)
Massage is very important in the treatment of Naturopathy. The history of Massage is as old as that. Massage has been practiced for thousands of years in countries such as India, China, Greece, Rome, Egypt and so on. We need not to go every time in spa or various Massage Parlour's instead we can do full body massage at home naturally by following below simple techniques.

And the most important part is, you did not required any partner or masseur for doing your massage. You can do it yourself and as when required. So just read the below article and follow the same.

How to do Body Massage? Let's follow below simple steps while massaging

Massage is usually done with dry hands. But if the skin is rough or too weak, massage can be done with a wet cloth or with oil. Sesame oil is best for massage, some people use powder for massage, but it is not good, the pores of the skin gets closed with the use of powder.

First massage the hands and feet. Then, respectively, the chest, stomach, abdomen, waist, clans and finally the face and head. If possible, massage yourself is a bit of exercise. Weak people seek the help of others for massage.

See the direction of massage in the below picture.
types of massage in naturopathy, naturopathy massage techniques, how to do massage at home, sesame oil massage, benefits of massage, natural body massage, stomach massage, chest massage, abdomen massage, waist massage, clans massage, direction of massage, bath after massage, precautions during massage
After Massage, bathing with warm water is desirable.

If there is high blood pressure, massage it from head to toe. 

Benefits of Body Massage on body functions & Organs

Massage has been found to have a great effect on various body functions and organs. Let's look at some of the effects below,

Skin: Massage benefits the skin very well. The release of toxins from the skin helps in draining the toxins.

Muscle: Muscle tension decreases with massage. If it hurts, the pain subsides. Lactic acid accumulates in the muscles if you work too hard. This acid is washed away by massage and increases refreshment. 

Blood circulation: Blood circulation accelerates by the Massage. Relative parts of the body gain strength and their immune system increases. Increased circulation reduces swelling. Massage enhances the ability of the blood to carry oxygen and use it.

Nerve: Gently, gently massaging stimulates nerve fibers, reducing stress on them. Heavy massage works by stimulating the dull nerves.

Digestive tract: Massaging the stomach stimulates the digestive tract. Increases the efficiency of the liver and hence the body's immune system.

Urinary Tract: Massaging stimulates the kidneys. Increasing urine levels accelerates the release of toxins from the body.

Heart: Properly massaged lightens the heart burden and improves its efficiency.

Do not massage in the following situations

1. Do not massage while fever. 
2. Pregnant should avoid massage on the stomach.
3. If diarrhea, stomach and intestinal ulcers, swelling of the appendix or lumps in the abdomen, then do not massage on the stomach. 
4. There is usually no massage in dermatology.

Above article is taken from आरोग्याची गुरुकिल्ली - निसर्गोपचार पद्धती Book.

Read More

Steps And Benefits of Shavasana Or Corpse Pose | शवासन

April 15, 2020
Steps And Benefits of Shavasana Or Corpse Pose | शवासन
Corpse pose benefits, Shavasana yoga pose, corpse yoga pose, corpse pose steps, shavasana benefits, how to do shavasana, how to do corpse pose, savasana or shavasana, shavasana meaning, shavasana procedure benefits and contraindications, shavasana pronunciation, anatomical effects of shavasana, shavasana meaning and benefits, purpose of savasana, savasana meditation, purpose of shavasana.
This asana is also known as 'Mrtasana'. It involves trying to separate the mind from the body. If you want at least a maximum amount of rest, there is no other solution like Shavasana. Nowadays everyone has accepted that this is the perfect way to relieve stress in today's fast and competitive life.

Before starting please follow Important Guidelines to get maximum benefits of Shavasana or Corpse Pose.

How to do Shavasana or Corpse Pose

This asana is divided in three steps as below,
1. Lie on your back without a pillow. Keep your hands and feet in line with your habits. Then the body should be relaxed or loosen. Try to loose every muscle. First of all, focus on the muscles of the feet and relax as much as possible. Then relax the thighs, lower back, upper body, arms, neck and face muscles respectively. The visitor must feel that there is no life in your body
2. Pay attention to the breathing action as the muscles relaxes. Inhale very slowly and exhale slowly, gradually slowing down the action. You must feel that you are not breathing.
3. This stage is very important. But it is just as difficult. The third step requires a lot of study to achieve it.

The purpose of this state is to slow down the mind. The mind must be completely free, uninhabitable - this is the ideal state of this asana. Since not everyone can do the same, so one should focus the mind on auspicious, religious thoughts. He also gets the expected benefits.
Corpse pose benefits, Shavasana yoga pose, corpse yoga pose, corpse pose steps, shavasana benefits, how to do shavasana, how to do corpse pose, savasana or shavasana, shavasana meaning, shavasana procedure benefits and contraindications, shavasana pronunciation, anatomical effects of shavasana, shavasana meaning and benefits, purpose of savasana, savasana meditation, purpose of shavasana.

Time: 10 Minutes to 15 Minutes

Benefits of Shavasana or Corpse Pose

1. This asana is best for depression, high blood pressure, heart disease and insomnia. These patients should do this asana regularly. 
2. Muscle weakness, fatigue and negative thinking is overcome by doing this. 
3. Body, mind, brain and soul get complete rest, strength, enthusiasm and joy. 
4. A state of meditation develops. 
5. The body's fatigue is removed in a short time by doing Shavasana in between other asanas.

Read More

Monday, April 13, 2020

Steps And Benefits of Vajrasana | वज्रासन

April 13, 2020
Steps And Benefits of Vajrasana | वज्रासन
Vajrasana precautions, vajrasana benefits, vajrasana time limit, vajrasana is equal to walking, vajrasana variations, vajrasana also known as, vajrasana in english, how to do vajrasana, how to do thunderbolt pose, benefits of vajrasana, steps of vajrasana, Vajrasana in yoga, thunderbolt pose in yoga, benefits of thunderbolt pose, vajrasana ramdev baba
Vajrasana or it is also called as Thunderbolt Pose.

Before starting please follow Important Guidelines to get maximum benefits of Vajrasana.

How to do Vajrasana or Thunderbolt Pose

1. Sit on your knees.
2. Take your foot backward and touch the thumbs of your feet each other and sit right on your feet.
3. You should keep your spine & head straight.
4. Keep your hands on your knees.
5. The breathing should be normal during the Vajrasana.
Vajrasana precautions, vajrasana benefits, vajrasana time limit, vajrasana is equal to walking, vajrasana variations, vajrasana also known as, vajrasana in english, how to do vajrasana, how to do thunderbolt pose, benefits of vajrasana, steps of vajrasana, Vajrasana in yoga, thunderbolt pose in yoga, benefits of thunderbolt pose, vajrasana ramdev baba
Time: 5 minutes to half an hour.

Benefits of Vajrasana or Thunderbolt Pose

1. This is a meditative posture. Removes the fogginess of the mind. 
3. This is the only posture to be done after a meal, by doing this, indigestion, acidity, gas, constipation are eliminated. 
4. Perform this asana after meals for 5 to 15 minutes to properly digestion of foods.
5. Eliminates knee pain.
6. Improves health by increasing the number of white particles produced in tonsils, bone cavities etc..

Read More

Saturday, April 11, 2020

Steps And Benefits of Chakrasana Or Urdhva Dhanurasana Or Wheel Pose | चक्रासन

April 11, 2020
Steps And Benefits of Chakrasana Or Urdhva Dhanurasana Or Wheel Pose | चक्रासन
Chakrasana steps, six benefits of chakrasana, chakrasana preparatory poses, chakrasana wikipedia, chakrasana, chakrasana in english, chakrasana benefits for weight loss, urdhva dhanurasana meaning, urdhva dhanurasana sequence, urdhva dhanurasana iyengar, urdhva dhanurasana information, eka pada urdhva dhanurasana, urdhva dhanurasana information in english, chakrasana benefits, chakrasana steps, urdhva dhanurasana steps, urdhva dhanurasana benefits, wheel pose benefits, wheel pose steps, how to do wheel pose, how to do chakrasana, how to urdhva dhanurasana.
Chakrasana or Urdhva Dhanurasana. The position of this asana looks like a wheel that is why it is also known as wheel Pose.

Before starting please follow Important Guidelines to get maximum benefits of Wheel Pose or Chakrasana or Urdhva Dhanurasana.

How to do Chakrasana or Wheel Pose or Urdhva Dhanurasana

1. Lie on your back and bend your knees. The heels are close to the buttocks.
2. Keep both hands upside down and at a slight difference behind the shoulders it helps for balancing.
3. After filling in the breath, lift up the chest and chest. Slowly try to bring hands and feet closer, so that the body becomes like a circle.
4. While leaving the posture, loosen the body and rest the waist on the ground.
5. Repeat it for 3-4 times.
Chakrasana steps, six benefits of chakrasana, chakrasana preparatory poses, chakrasana wikipedia, chakrasana, chakrasana in english, chakrasana benefits for weight loss, urdhva dhanurasana meaning, urdhva dhanurasana sequence, urdhva dhanurasana iyengar, urdhva dhanurasana information, eka pada urdhva dhanurasana, urdhva dhanurasana information in english, chakrasana benefits, chakrasana steps, urdhva dhanurasana steps, urdhva dhanurasana benefits, wheel pose benefits, wheel pose steps, how to do wheel pose, how to do chakrasana, how to urdhva dhanurasana.
Time: 1 Minute to 5 minutes (Repeat it for 3-4 times).

Benefits of Chakrasana or Urdhva Dhanurasana or Wheel Pose

1. Activates the stomach and intestines.
2. Increases vigor, strength and sharpness in the body.
3. Regular practice of this asana does not allow hump in old age.
4. It is particularly beneficial in breathing, headache, eye thoughts, cervical and spondylitis.
5. Strengthens the muscles of the extremities.
6. Removes uterine disorders of women.

Read More

Thursday, April 9, 2020

Steps And Benefits of Dhanurasana or Bow Pose | धनुरासन

April 09, 2020
Steps And Benefits of Dhanurasana or Bow Pose | धनुरासन
dhanurasana stretches, dhanurasana benefits, dhanurasana steps, dhanurasana preparatory poses, dhanurasana in english, bow pose for beginners, bow pose benefits, bow pose, how to do dhanurasana yoga, how to do bow pose yoga, dhanurasana, precautions of dhanurasana, dhanurasana benefits in english, precautions of bow pose, benefits of dhanurasana, benefits of bow pose, steps of dhanurasana, steps of bow pose
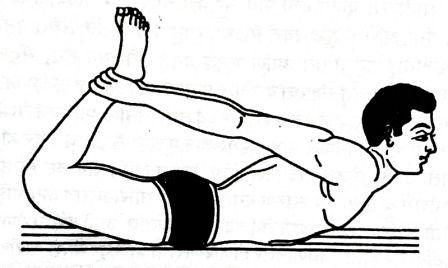
In this asana the shape of body becomes like a Bow so it is called as Dhanurasana or Bow Pose.

Before starting please follow Important Guidelines to get maximum benefits of Dhanurasana or Bow Pose.

How to do Dhanurasana or Bow Pose

1. Lie on your stomach. Keep the heels above the buttocks by bending the legs from the knees. Knees and toes are joined together. 
2. With both hands, hold the feet close to the ankles. 
3. Breathing inwards, lifting the knees and thighs, keep the arms upright, arms straight. After the last part is lifted, raise the upper part of the chest, cervix and head also. The area around the navel and stomach remained on the ground. The remaining part should be lifted up. 
4. The shape of the body will become like a string of bows. In this case, stay for 10 to 30 seconds. 
5. Exhale and return to the previous position. Do a second rep. when breathing is normal. Repeat this for 3-4 times.
dhanurasana stretches, dhanurasana benefits, dhanurasana steps, dhanurasana preparatory poses, dhanurasana in english, bow pose for beginners, bow pose benefits, bow pose, how to do dhanurasana yoga, how to do bow pose yoga, dhanurasana, precautions of dhanurasana, dhanurasana benefits in english, precautions of bow pose, benefits of dhanurasana, benefits of bow pose, steps of dhanurasana, steps of bow pose
Time: Hold this posture for 10-30 seconds and repeat for 3-4 times.

Benefits of Dhanurasana or Bow Pose

1. Makes the spinal cord flexible and healthy.
2. This posture is beneficial in Cervical, spondylitis, backache and abdominal diseases. 
3. It is beneficial in menstrual disorders of women. 
4. It is beneficial in urine disorders by strengthening the kidneys. It is beneficial in conditions like urination due to fear.
5. Practice of Dhanurasana reduces stomach fat, eliminate gas. Stomach diseases disappear. The hunger strikes, the appetite increases.

Dhanurasana or Bow Pose Precautions

1. Those who suffer from excessive problems of spinal cord and disc should not perform this pose. 
2. If you suffer from severe stomach related problems then don't perform this pose.

Read More

Steps And Benefits of Halasana or Plow Pose | हलासन

April 09, 2020
Steps And Benefits of Halasana or Plow Pose | हलासन
halasana benefits, halasana for beginners, halasana variations, halasana information and benefits, halasana contraindications, halasana benefits in english, halasana, how to do halasana, plow pose benefits, plow pose for beginners, cant do plow pose, plow pose with bent knees, plow yoga pose danger, plow pose alternatives, plow pose progression,halasana benefits and precautions, halasana for weight loss, how to do halasana, how to do plow pose
In this asana, the shape of the body becomes like a plow so it is called Halasana or Plow Pose.

Before starting please follow Important Guidelines to get maximum benefits of Halasana or Plow Pose.

How to do Halasana or Plow Pose

1. Lie on your back. Now while breathing in, slowly raise the legs. After lifting first 30 degrees, then 60 degrees and then 90 degrees, move the legs towards the back of the head while also raising the back while exhaling.
2. Place the feet behind the head on the ground. Breathing speed will be normal. Initially, the hands can be placed behind the waist for convenience. Keep your hands on the ground in full condition. Stay 30 seconds in this situation.
3. While coming back, keep the feet straight with your knees and rest on the ground while pressing the land with the palms in the same way you came up.
halasana benefits, halasana for beginners, halasana variations, halasana information and benefits, halasana contraindications, halasana benefits in english, halasana, how to do halasana, plow pose benefits, plow pose for beginners, cant do plow pose, plow pose with bent knees, plow yoga pose danger, plow pose alternatives, plow pose progression,halasana benefits and precautions, halasana for weight loss, how to do halasana, how to do plow pose
Time: 30 seconds to 20 minutes.

Benefits of Halasana or Plow Pose

1. By making the spinal cord healthy and flexible, it also makes the back muscles wide and healthy.
2. Thyroid removes obesity, dwarfness and weakness etc. by making sugarcane agile.
3. It is beneficial in indigestion, gas, constipation, spleen and liver enlargement and heart disease.
4. Activates the pancreas and cures diabetes.
5. Useful in female diseases like dysmenorrhea etc.

Halasana or Plow Pose Precautions

1. This posture is prohibited in the enlarged spleen and liver.
2. Patients with hypertension, cervical spine, etc. should not do this.
3. Do not perform this asana if you have T. B. in slip disc and spinal cord.

Read More