April 2020 - Health Blog

Saturday, April 18, 2020

Surya Namaskar Or Sun Salutation | Steps And Benefits of Surya Namaskar

April 18, 2020
Surya Namaskar Or Sun Salutation | Steps And Benefits of Surya Namaskar
Surya Namaskar, surya namaskar wikipedia, surya namaskar for beginners, 12 poses of surya namaskar, surya namaskar benefits, surya namaskar mantra, surya namaskar meaning, benefits of surya namaskar steps, surya namaskar exercise, surya namaskar 12 steps name, surya namaskar names, surya namaskar ramdev, asanas in suryanamaskar,  surya namaskar image with name, precautions of surya namaskar, sun salutation for beginners, sun salutation flow, sun salutation benefits, sun salutation steps, how to do sun salutation, how to do surya Namaskar.
That most familiar of asana sequences, Surya Namaskar or Sun Salutation is as rich in symbolic and mythic overtones as it is in physical benefits. It is a sequence of 12 powerful yoga poses. It is best done in early morning at sunrise on an empty stomach.

The whole body gets health, strength and energy through Surya Namaskar. This brings activity in all the organs of the body and regulates the process of hormones) of all the internal glands of the body. If possible, do it at sunrise. You can do Surya Namaskar from 1 to 21 times as often as possible.

12 Steps of Surya Namaskar or Sun Salutation

Step 1-Pranamasana (Prayer Pose): Stand facing the sun and place your hands in front of the chest in a salutation position. 
Step 2-Hasta Uttanasana (Raised Arms Pose): Breathing inwards, open the hands from the front and move them backwards. The sight should be towards the sky. Tilt the waist as well as back. 
Step 3-Hasta Padasana (Standing Forward Bend Pose): After exhaling, rest your hands on the ground near the feet, bending the back from the front. If possible, also touch the palms from the ground and try to put the head on the knees.
Pranamasana (Prayer Pose), Hasta Uttanasana (Raised Arms Pose), Hasta Padasana (Standing Forward Bend Pose)
Step 4-Ashwa Sanchalanasana (Lunge Pose): Now bending down, keep the palms of the hands on both sides of the chest. With the left leg raised, move back to the position of Bhujangasana, the right leg should be in between the two hands. The knee should remain in front of the chest and the heel of the foot rests on the ground. Let the vision be towards the sky, keep breathing in.
Ashwa Sanchalanasana (Lunge Pose)

Step 5-Adho Mukha Svanasana (Downward Facing Dog Pose): Withdraw the breath and also move the right leg backward. Neck and head stay between both hands. Look at the navel by raising the hip and waist and tilting the head.
Adho Mukha Svanasana (Downward Facing Dog Pose)
Step 6-Ashtanga Namaskara (Eight Limbed Pose): Keeping the hands and toes stable, touch the chest and knees on the ground, thus, two hands, two legs, two knees, chest and head stick on the ground of these eight limbs, this is prostration. Breathing is normal.
Ashtanga Namaskara (Eight Limbed Pose)
Step 7-Bhujangasana (Cobra Pose): After inhaling, keep the chest high and keep an eye towards the sky, the waist rests on the ground, arms and legs should be straight.
Bhujangasana (Cobra Pose)
Step 8-Adho Mukha Svanasana (Downward Facing Dog Pose): Like previously written step number 5. 
Step 9-Ashwa Sanchalanasana (High Lunge Pose): Like the step number 4. Change foot position. In this, keep the left leg between the two hands. 
Step 10-Hasta Padasana (Standing Forward Bend Pose): Like step number 3. 
Step 11-Hasta Uttanasana (Raised Arms Pose): Like step number 2. 
Step 12-Pranamasana (Prayer Pose): Like step number 1.

Benefits of Surya Namaskar or Sun Salutation

1. Surya Namaskar is a complete exercise. By this, all the parts of the body becomes strong and healthy. 
2. Heals the stomach, bowel, stomach, pancreas, heart and lungs. 
3. By making the spinal cord and waist flexible, it removes the deformity there. 
4. The whole body conducts blood cruises smoothly, so eliminating the impurity of the blood also eliminates skin diseases.
5. The muscles of all the limbs, arms, legs, arms, thighs, shoulders, etc. are strong and beautiful. 
6. Increases the Mental peace and strength. 
7. It is also particularly useful for diabetes. 
8. Surya Namaskar provides complete healing to the entire body.

Surya Namaskar or Sun Salutation Precautions

Despite its many benefits, you must avoid from performing the Surya Namaskar if you are suffering from the following:
1. If you are suffering from back problems, you must practice Surya Namaskar under your yoga instructor's guidance.
2. Heart Patients can perform this yoga after consulting with doctor only.
2. People having high blood pressure can avoid this sequence.
3. Arthritis leads to knee stiffness and thus hinders mobility. Since Surya Namaskar involves knee movements, you must perform it with caution if you are an arthritis patient.
4. If you have a severe wrist injury, you can avoid this sequence.
5. Pregnant women should not practice Sun Salutation as it puts pressure on the back and abdominal regions, thereby harming both the mother and the fetus.
6. During Periods women must avoid performing Surya Namaskar.

Read More

Ayurveda’s Immunity Boosting Measures for Self Care during COVID-19 Crisis

April 18, 2020
Ayurveda’s Immunity Boosting Measures for Self Care during COVID-19 Crisis
COVID 19, COVID 19 self care measures, Indian Ministry of AYUSH, Ayurveda’s Immunity Boosting Measures on COVID-19, ayurvedic perspective on corona virus, how to fight against corona virus, how to boost immunity, precautions during COVID 19
This Measures are Published by Indian Ministry of AYUSH in order to fight against COVID-19.

In the wake of the Covid 19 outbreak, entire mankind across the globe is suffering. Enhancing the body’s natural defence system (immunity) plays an important role in maintaining optimum health.

We all know that prevention is better than cure. While there is no medicine for COVID-19 as of now, it will be good to take preventive measures which boost our immunity in these times.

Ayurveda, being the science of life, propagates the gifts of nature in maintaining healthy and happy living. Ayurveda’s extensive knowledge base on preventive
care, derives from the concepts of “Dinacharya” - daily regimes and “Ritucharya” - seasonal regimes to maintain healthy life. It is a plant-based science. The simplicity of awareness about oneself and the harmony each individual can achieve by uplifting and maintaining his or her immunity is emphasized across Ayurveda’s classical scriptures.

Ministry of AYUSH recommends the following self-care guidelines for preventive health measures and boosting immunity with special reference to respiratory health. These are supported by Ayurvedic literature and scientific publications.

Recommended Measures

I - General Measures
1. Drink warm water throughout the day.
2. Daily practice of Yogasana, Pranayama and meditation for at least 30 minutes as advised by Ministry of AYUSH (#YOGAatHome #StayHome #StaySafe)
3. Spices like Haldi (Turmeric), Jeera (Cumin), Dhaniya (Coriander) and Lahsun (Garlic) are recommended in cooking.

II - Ayurvedic Immunity Promoting Measures
1. Take Chyavanprash 10gm (1tsf) in the morning. Diabetics should take sugar
free Chyavanprash.
2. Drink herbal tea / decoction (Kadha) made from Tulsi (Basil), Dalchini (Cinnamon), Kalimirch (Black pepper), Shunthi (Dry Ginger) and Munakka (Raisin) - once or twice a day. Add jaggery (natural sugar) and / or fresh lemon juice to your taste, if needed.
3. Golden Milk- Half tea spoon Haldi (turmeric) powder in 150 ml hot milk once or twice a day.

III - Simple Ayurvedic Procedures
1. Nasal application - Apply sesame oil / coconut oil or Ghee in both the nostrils (Pratimarsh Nasya) in morning and evening.
2. Oil pulling therapy- Take 1 table spoon sesame or coconut oil in mouth. Do not drink, Swish in the mouth for 2 to 3 minutes and spit it off followed by warm water rinse. This can be done once or twice a day.

IV - During dry cough / sore throat
1. Steam inhalation with fresh Pudina (Mint) leaves or Ajwain (Caraway seeds) can be practiced once in a day.
2. Lavang (Clove) powder mixed with natural sugar / honey can be taken 2-3 times a day in case of cough or throat irritation.
3. These measures generally treat normal dry cough and sore throat. However, it is best to consult doctors if these symptoms persist.

1 The above measures can be followed to the extent possible as per an
individual’s convenience.

2 These measures are recommended by following eminent Vaidyas from
across the Country as they may possibly boost an individual’s immunity
against infections.

1. Padma Shri Vaidya P R Krishnakumar, Coimbatore
2. Padma Bhushan Vaidya Devendra Triguna, Delhi
3. Vaidya P M Varier, Kottakkal
4. Vaidya Jayant Devpujari, Nagpur
5. Vaidya Vinay Velankar, Thane
6. Vaidya B S Prasad, Belgaum
7. Padma Shri Vaidya Gurdeep Singh, Jamnagar
8. Acharya Balkrishna ji, Haridwar
9. Vaidya M S Baghel, Jaipur
10.Vaidya R B Dwivedi, Hardoi UP
11.Vaidya K N Dwivedi, Varanasi
12.Vaidya Rakesh Sharma, Chandigarh
13.Vaidya Abichal Chattopadhyay, Kolkata
14.Vaidya Tanuja Nesari, Delhi
15.Vaidya Sanjeev Sharma, Jaipur
16.Vaidya Anup Thakar, Jamnagar

Disclaimer: The above advisory does not claim to be treatment for COVID-19.

Read the official release by clicking on below link-

Read More

Wednesday, April 15, 2020

How To Do Body Massage at Home? (Naturopathy Massage Techniques and Benefits)

April 15, 2020
How To Do Body Massage at Home? (Naturopathy Massage Techniques and Benefits)
Massage is very important in the treatment of Naturopathy. The history of Massage is as old as that. Massage has been practiced for thousands of years in countries such as India, China, Greece, Rome, Egypt and so on. We need not to go every time in spa or various Massage Parlour's instead we can do full body massage at home naturally by following below simple techniques.

And the most important part is, you did not required any partner or masseur for doing your massage. You can do it yourself and as when required. So just read the below article and follow the same.

How to do Body Massage? Let's follow below simple steps while massaging

Massage is usually done with dry hands. But if the skin is rough or too weak, massage can be done with a wet cloth or with oil. Sesame oil is best for massage, some people use powder for massage, but it is not good, the pores of the skin gets closed with the use of powder.

First massage the hands and feet. Then, respectively, the chest, stomach, abdomen, waist, clans and finally the face and head. If possible, massage yourself is a bit of exercise. Weak people seek the help of others for massage.

See the direction of massage in the below picture.
types of massage in naturopathy, naturopathy massage techniques, how to do massage at home, sesame oil massage, benefits of massage, natural body massage, stomach massage, chest massage, abdomen massage, waist massage, clans massage, direction of massage, bath after massage, precautions during massage
After Massage, bathing with warm water is desirable.

If there is high blood pressure, massage it from head to toe. 

Benefits of Body Massage on body functions & Organs

Massage has been found to have a great effect on various body functions and organs. Let's look at some of the effects below,

Skin: Massage benefits the skin very well. The release of toxins from the skin helps in draining the toxins.

Muscle: Muscle tension decreases with massage. If it hurts, the pain subsides. Lactic acid accumulates in the muscles if you work too hard. This acid is washed away by massage and increases refreshment. 

Blood circulation: Blood circulation accelerates by the Massage. Relative parts of the body gain strength and their immune system increases. Increased circulation reduces swelling. Massage enhances the ability of the blood to carry oxygen and use it.

Nerve: Gently, gently massaging stimulates nerve fibers, reducing stress on them. Heavy massage works by stimulating the dull nerves.

Digestive tract: Massaging the stomach stimulates the digestive tract. Increases the efficiency of the liver and hence the body's immune system.

Urinary Tract: Massaging stimulates the kidneys. Increasing urine levels accelerates the release of toxins from the body.

Heart: Properly massaged lightens the heart burden and improves its efficiency.

Do not massage in the following situations

1. Do not massage while fever. 
2. Pregnant should avoid massage on the stomach.
3. If diarrhea, stomach and intestinal ulcers, swelling of the appendix or lumps in the abdomen, then do not massage on the stomach. 
4. There is usually no massage in dermatology.

Above article is taken from आरोग्याची गुरुकिल्ली - निसर्गोपचार पद्धती Book.

Read More

Steps And Benefits of Shavasana Or Corpse Pose | शवासन

April 15, 2020
Steps And Benefits of Shavasana Or Corpse Pose | शवासन
Corpse pose benefits, Shavasana yoga pose, corpse yoga pose, corpse pose steps, shavasana benefits, how to do shavasana, how to do corpse pose, savasana or shavasana, shavasana meaning, shavasana procedure benefits and contraindications, shavasana pronunciation, anatomical effects of shavasana, shavasana meaning and benefits, purpose of savasana, savasana meditation, purpose of shavasana.
This asana is also known as 'Mrtasana'. It involves trying to separate the mind from the body. If you want at least a maximum amount of rest, there is no other solution like Shavasana. Nowadays everyone has accepted that this is the perfect way to relieve stress in today's fast and competitive life.

Before starting please follow Important Guidelines to get maximum benefits of Shavasana or Corpse Pose.

How to do Shavasana or Corpse Pose

This asana is divided in three steps as below,
1. Lie on your back without a pillow. Keep your hands and feet in line with your habits. Then the body should be relaxed or loosen. Try to loose every muscle. First of all, focus on the muscles of the feet and relax as much as possible. Then relax the thighs, lower back, upper body, arms, neck and face muscles respectively. The visitor must feel that there is no life in your body
2. Pay attention to the breathing action as the muscles relaxes. Inhale very slowly and exhale slowly, gradually slowing down the action. You must feel that you are not breathing.
3. This stage is very important. But it is just as difficult. The third step requires a lot of study to achieve it.

The purpose of this state is to slow down the mind. The mind must be completely free, uninhabitable - this is the ideal state of this asana. Since not everyone can do the same, so one should focus the mind on auspicious, religious thoughts. He also gets the expected benefits.
Corpse pose benefits, Shavasana yoga pose, corpse yoga pose, corpse pose steps, shavasana benefits, how to do shavasana, how to do corpse pose, savasana or shavasana, shavasana meaning, shavasana procedure benefits and contraindications, shavasana pronunciation, anatomical effects of shavasana, shavasana meaning and benefits, purpose of savasana, savasana meditation, purpose of shavasana.

Time: 10 Minutes to 15 Minutes

Benefits of Shavasana or Corpse Pose

1. This asana is best for depression, high blood pressure, heart disease and insomnia. These patients should do this asana regularly. 
2. Muscle weakness, fatigue and negative thinking is overcome by doing this. 
3. Body, mind, brain and soul get complete rest, strength, enthusiasm and joy. 
4. A state of meditation develops. 
5. The body's fatigue is removed in a short time by doing Shavasana in between other asanas.

Read More

Monday, April 13, 2020

Steps And Benefits of Vajrasana | वज्रासन

April 13, 2020
Steps And Benefits of Vajrasana | वज्रासन
Vajrasana precautions, vajrasana benefits, vajrasana time limit, vajrasana is equal to walking, vajrasana variations, vajrasana also known as, vajrasana in english, how to do vajrasana, how to do thunderbolt pose, benefits of vajrasana, steps of vajrasana, Vajrasana in yoga, thunderbolt pose in yoga, benefits of thunderbolt pose, vajrasana ramdev baba
Vajrasana or it is also called as Thunderbolt Pose.

Before starting please follow Important Guidelines to get maximum benefits of Vajrasana.

How to do Vajrasana or Thunderbolt Pose

1. Sit on your knees.
2. Take your foot backward and touch the thumbs of your feet each other and sit right on your feet.
3. You should keep your spine & head straight.
4. Keep your hands on your knees.
5. The breathing should be normal during the Vajrasana.
Vajrasana precautions, vajrasana benefits, vajrasana time limit, vajrasana is equal to walking, vajrasana variations, vajrasana also known as, vajrasana in english, how to do vajrasana, how to do thunderbolt pose, benefits of vajrasana, steps of vajrasana, Vajrasana in yoga, thunderbolt pose in yoga, benefits of thunderbolt pose, vajrasana ramdev baba
Time: 5 minutes to half an hour.

Benefits of Vajrasana or Thunderbolt Pose

1. This is a meditative posture. Removes the fogginess of the mind. 
3. This is the only posture to be done after a meal, by doing this, indigestion, acidity, gas, constipation are eliminated. 
4. Perform this asana after meals for 5 to 15 minutes to properly digestion of foods.
5. Eliminates knee pain.
6. Improves health by increasing the number of white particles produced in tonsils, bone cavities etc..

Read More

Saturday, April 11, 2020

Steps And Benefits of Chakrasana Or Urdhva Dhanurasana Or Wheel Pose | चक्रासन

April 11, 2020
Steps And Benefits of Chakrasana Or Urdhva Dhanurasana Or Wheel Pose | चक्रासन
Chakrasana steps, six benefits of chakrasana, chakrasana preparatory poses, chakrasana wikipedia, chakrasana, chakrasana in english, chakrasana benefits for weight loss, urdhva dhanurasana meaning, urdhva dhanurasana sequence, urdhva dhanurasana iyengar, urdhva dhanurasana information, eka pada urdhva dhanurasana, urdhva dhanurasana information in english, chakrasana benefits, chakrasana steps, urdhva dhanurasana steps, urdhva dhanurasana benefits, wheel pose benefits, wheel pose steps, how to do wheel pose, how to do chakrasana, how to urdhva dhanurasana.
Chakrasana or Urdhva Dhanurasana. The position of this asana looks like a wheel that is why it is also known as wheel Pose.

Before starting please follow Important Guidelines to get maximum benefits of Wheel Pose or Chakrasana or Urdhva Dhanurasana.

How to do Chakrasana or Wheel Pose or Urdhva Dhanurasana

1. Lie on your back and bend your knees. The heels are close to the buttocks.
2. Keep both hands upside down and at a slight difference behind the shoulders it helps for balancing.
3. After filling in the breath, lift up the chest and chest. Slowly try to bring hands and feet closer, so that the body becomes like a circle.
4. While leaving the posture, loosen the body and rest the waist on the ground.
5. Repeat it for 3-4 times.
Chakrasana steps, six benefits of chakrasana, chakrasana preparatory poses, chakrasana wikipedia, chakrasana, chakrasana in english, chakrasana benefits for weight loss, urdhva dhanurasana meaning, urdhva dhanurasana sequence, urdhva dhanurasana iyengar, urdhva dhanurasana information, eka pada urdhva dhanurasana, urdhva dhanurasana information in english, chakrasana benefits, chakrasana steps, urdhva dhanurasana steps, urdhva dhanurasana benefits, wheel pose benefits, wheel pose steps, how to do wheel pose, how to do chakrasana, how to urdhva dhanurasana.
Time: 1 Minute to 5 minutes (Repeat it for 3-4 times).

Benefits of Chakrasana or Urdhva Dhanurasana or Wheel Pose

1. Activates the stomach and intestines.
2. Increases vigor, strength and sharpness in the body.
3. Regular practice of this asana does not allow hump in old age.
4. It is particularly beneficial in breathing, headache, eye thoughts, cervical and spondylitis.
5. Strengthens the muscles of the extremities.
6. Removes uterine disorders of women.

Read More

Thursday, April 9, 2020

Steps And Benefits of Dhanurasana or Bow Pose | धनुरासन

April 09, 2020
Steps And Benefits of Dhanurasana or Bow Pose | धनुरासन
dhanurasana stretches, dhanurasana benefits, dhanurasana steps, dhanurasana preparatory poses, dhanurasana in english, bow pose for beginners, bow pose benefits, bow pose, how to do dhanurasana yoga, how to do bow pose yoga, dhanurasana, precautions of dhanurasana, dhanurasana benefits in english, precautions of bow pose, benefits of dhanurasana, benefits of bow pose, steps of dhanurasana, steps of bow pose
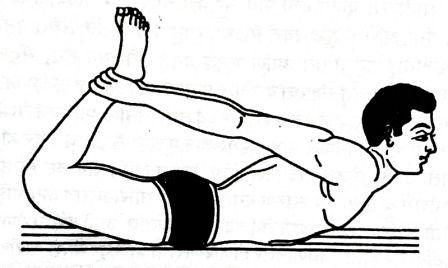
In this asana the shape of body becomes like a Bow so it is called as Dhanurasana or Bow Pose.

Before starting please follow Important Guidelines to get maximum benefits of Dhanurasana or Bow Pose.

How to do Dhanurasana or Bow Pose

1. Lie on your stomach. Keep the heels above the buttocks by bending the legs from the knees. Knees and toes are joined together. 
2. With both hands, hold the feet close to the ankles. 
3. Breathing inwards, lifting the knees and thighs, keep the arms upright, arms straight. After the last part is lifted, raise the upper part of the chest, cervix and head also. The area around the navel and stomach remained on the ground. The remaining part should be lifted up. 
4. The shape of the body will become like a string of bows. In this case, stay for 10 to 30 seconds. 
5. Exhale and return to the previous position. Do a second rep. when breathing is normal. Repeat this for 3-4 times.
dhanurasana stretches, dhanurasana benefits, dhanurasana steps, dhanurasana preparatory poses, dhanurasana in english, bow pose for beginners, bow pose benefits, bow pose, how to do dhanurasana yoga, how to do bow pose yoga, dhanurasana, precautions of dhanurasana, dhanurasana benefits in english, precautions of bow pose, benefits of dhanurasana, benefits of bow pose, steps of dhanurasana, steps of bow pose
Time: Hold this posture for 10-30 seconds and repeat for 3-4 times.

Benefits of Dhanurasana or Bow Pose

1. Makes the spinal cord flexible and healthy.
2. This posture is beneficial in Cervical, spondylitis, backache and abdominal diseases. 
3. It is beneficial in menstrual disorders of women. 
4. It is beneficial in urine disorders by strengthening the kidneys. It is beneficial in conditions like urination due to fear.
5. Practice of Dhanurasana reduces stomach fat, eliminate gas. Stomach diseases disappear. The hunger strikes, the appetite increases.

Dhanurasana or Bow Pose Precautions

1. Those who suffer from excessive problems of spinal cord and disc should not perform this pose. 
2. If you suffer from severe stomach related problems then don't perform this pose.

Read More

Steps And Benefits of Halasana or Plow Pose | हलासन

April 09, 2020
Steps And Benefits of Halasana or Plow Pose | हलासन
halasana benefits, halasana for beginners, halasana variations, halasana information and benefits, halasana contraindications, halasana benefits in english, halasana, how to do halasana, plow pose benefits, plow pose for beginners, cant do plow pose, plow pose with bent knees, plow yoga pose danger, plow pose alternatives, plow pose progression,halasana benefits and precautions, halasana for weight loss, how to do halasana, how to do plow pose
In this asana, the shape of the body becomes like a plow so it is called Halasana or Plow Pose.

Before starting please follow Important Guidelines to get maximum benefits of Halasana or Plow Pose.

How to do Halasana or Plow Pose

1. Lie on your back. Now while breathing in, slowly raise the legs. After lifting first 30 degrees, then 60 degrees and then 90 degrees, move the legs towards the back of the head while also raising the back while exhaling.
2. Place the feet behind the head on the ground. Breathing speed will be normal. Initially, the hands can be placed behind the waist for convenience. Keep your hands on the ground in full condition. Stay 30 seconds in this situation.
3. While coming back, keep the feet straight with your knees and rest on the ground while pressing the land with the palms in the same way you came up.
halasana benefits, halasana for beginners, halasana variations, halasana information and benefits, halasana contraindications, halasana benefits in english, halasana, how to do halasana, plow pose benefits, plow pose for beginners, cant do plow pose, plow pose with bent knees, plow yoga pose danger, plow pose alternatives, plow pose progression,halasana benefits and precautions, halasana for weight loss, how to do halasana, how to do plow pose
Time: 30 seconds to 20 minutes.

Benefits of Halasana or Plow Pose

1. By making the spinal cord healthy and flexible, it also makes the back muscles wide and healthy.
2. Thyroid removes obesity, dwarfness and weakness etc. by making sugarcane agile.
3. It is beneficial in indigestion, gas, constipation, spleen and liver enlargement and heart disease.
4. Activates the pancreas and cures diabetes.
5. Useful in female diseases like dysmenorrhea etc.

Halasana or Plow Pose Precautions

1. This posture is prohibited in the enlarged spleen and liver.
2. Patients with hypertension, cervical spine, etc. should not do this.
3. Do not perform this asana if you have T. B. in slip disc and spinal cord.

Read More

Steps And Benefits of Bhujangasana Or Cobra Pose | भुजंगासन

April 09, 2020
Steps And Benefits of Bhujangasana Or Cobra Pose | भुजंगासन
cobra pose benefits, cobra pose variations, cobra pose vs upward dog, cobra pose, benefits of cobra pose for male, yoga poses, bhujangasana steps, bhujangasana benefits, bhujangasana contraindications, bhujangasana in english, bhujangasana benefits & precautions,bhujangasana exercise, bhujangasana benefits and contraindications, how many times to do bhujangasana, how to do Bhujangasana, how to do cobra pose, bhujangasana yoga pose
The name Bhujangasana comes from the Sanskrit word 'bhujanga' which translates to 'snake' and 'asana' meaning 'posture'. It is also called as Cobra Pose.

Before starting please follow Important Guidelines to get maximum benefits of Cobra Pose or Bhujangasana.

How to do Cobra Pose or Bhujangasana

1. Lie on your stomach.
2. Keeping the palms of the hands on the ground, place the hands on both sides of the chest. The elbows should be elevated and the arms should be adjacent to the chest. The legs are straight and the claws are joined together.
3.The claws should be stretched towards the back and fill the breath internally while raising the chest and head slowly.
4. The portion behind the navel should remain vacant on the ground.
5.While raising the head, the cervix should be folded as far back as possible. There should be about 30 seconds in this situation.
6. After 30 seconds, slowly lower your head. Bend your chest to the ground. Then lower your head to the ground.
7. After the posture is proven, inhale the seat as you breathe. When leaving the seat, the breathing should be released slowly after reaching the original position. Do this posture 8-10 times a day.
cobra pose benefits, cobra pose variations, cobra pose vs upward dog, cobra pose, benefits of cobra pose for male, yoga poses, bhujangasana steps, bhujangasana benefits, bhujangasana contraindications, bhujangasana in english, bhujangasana benefits & precautions,bhujangasana exercise, bhujangasana benefits and contraindications, how many times to do bhujangasana, how to do Bhujangasana, how to do cobra pose, bhujangasana yoga pose
Time: Hold this position for 30 seconds & repeat.

Benefits of Cobra Pose or Bhujangasana

1. Bhujangasana ignites gastritis, destroys all diseases and awakens kundalini.
2. All the spinal cord and the muscles around the neck get more pure blood. Therefore, the pulse system becomes conscious, everlasting, powerful and strong. In particular, the nerve cells that pass through the brain become stronger.
3. All diseases of the lateral bone are destroyed. Stress in the abdominal muscles gives the organs strength.
4. Pressure on abdominal relieves indigestion.
5. Chest and stomach develops as well as their diseases are destroyed
6. This posture makes the spine flexible. If you have backache due to fatigue, doing this posture only once will relieve it.
7. If a bone in the spinal cord is moved, performing Bhujangasana will make it sit back in place.
8. The uterus and bladder become healthy. As a result, menstruation is painless.

Read More

Tuesday, April 7, 2020

Steps And Benefits of Shirshasana or Headstand Pose | शीर्षासन

April 07, 2020
Steps And Benefits of Shirshasana or Headstand Pose | शीर्षासन
shirshasana benefits, shirshasana time, shirshasana in english, shirshasana also known as, shirshasana benefits for brain, benefits of shirshasana wikipedia, shirshasana information, headstand yoga benefits, yoga headstand progression, preparation for headstand, headstand variations, yoga headstand tips, headstand english, headstand steps, how to do shirshasana, how to do headstand pose, headstand contraindications, headstand Precautions, shirshasana Precautions, headstand time duration, steps and benefits of shirshasana in english, steps and benefits of headstand.
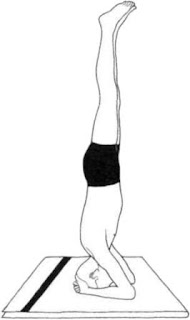
Shirshasana Or Headstand Pose is described as the king of all yoga poses due to its amazing physical, psychological and mental health effects on the body.

Before starting please follow Important Guidelines to get maximum benefits of Shirshasana or Headstand Pose.

How to do Shirshasana or Headstand Pose

1. Make a circular cushion of dhoti or any long cloth. Put the fingers of both hands together and keep the hands on the ground till the elbow. Keep the cushion between the hands. The top of the head should be on the cushion and the knees are on the ground.
2. Now, while balancing the body weight on the cervix and elbows, straighten the legs parallel to the ground.
3. Now raise one knee above and bend, after that lift the other knee up and bend it.
4. Now try to raise the bent knees one by one respectively. Do not rush in the beginning. Slowly the legs will start to straighten. When the legs become straight, keep them together at the beginning by bending slightly forward, otherwise there is a fear of falling backwards.
5. Eyes closed Breathing speed should be normal and hold this position for 15 seconds to half an hour.
6. The order in which the feet were raised should be brought back to the previous position.
7. After shirshasana, do the Shavasana or stand up, so that the flow of blood that was going on towards the brain becomes normal.
shirshasana benefits, shirshasana time, shirshasana in english, shirshasana also known as, shirshasana benefits for brain, benefits of shirshasana wikipedia, shirshasana information, headstand yoga benefits, yoga headstand progression, preparation for headstand, headstand variations, yoga headstand tips, headstand english, headstand steps, how to do shirshasana, how to do headstand pose, headstand contraindications, headstand Precautions, shirshasana Precautions, headstand time duration, steps and benefits of shirshasana in english, steps and benefits of headstand.
Time: 15 seconds to half an hour. (In normal state, doing 5 to 10 minutes is sufficient.)

Benefits of Shirshasana Or Headstand Pose

1. This posture is the king of all the asanas. With this, pure blood gets to the brain, which provides health to the eyes, ears, nose, etc.
2. It activates the brain by making the pituitary and pineal glands healthy. Develops memory, intelligence and perception power.
3. Activates the digestive system, stomach, bowel and liver, illuminates gastritis.
4. Cures diseases like enteritis, hysteria and testicles growth, hernia, constipation, vascular diseases.
5. By activating the thyroid gland, it removes both weakness and obesity, as both these diseases are caused by the irregularity of the thyroid function. The thyroid stabilizes celibacy by activating the gland.
6. It eliminates metallic diseases like dreaming, discharge, impotence, impotence etc.
7. Increases the vigor and strength of the mouth.
8. Untimely hair loss and whitening remove both diseases.

Shirshasana Or Headstand Pose Precautions

1. Those who are running ears or have pain in their ears should not do this asana.
2. Do not do it when there are myopia glasses or more redness on the eyes.
3. Heart and high blood pressure and back pain patients should not do this asana.
4. Do not do Shirshasana immediately after heavy exercise. While doing this asana, the body temperature should be reduced.
5. Do not perform this asana even if there is a cold.

Read More